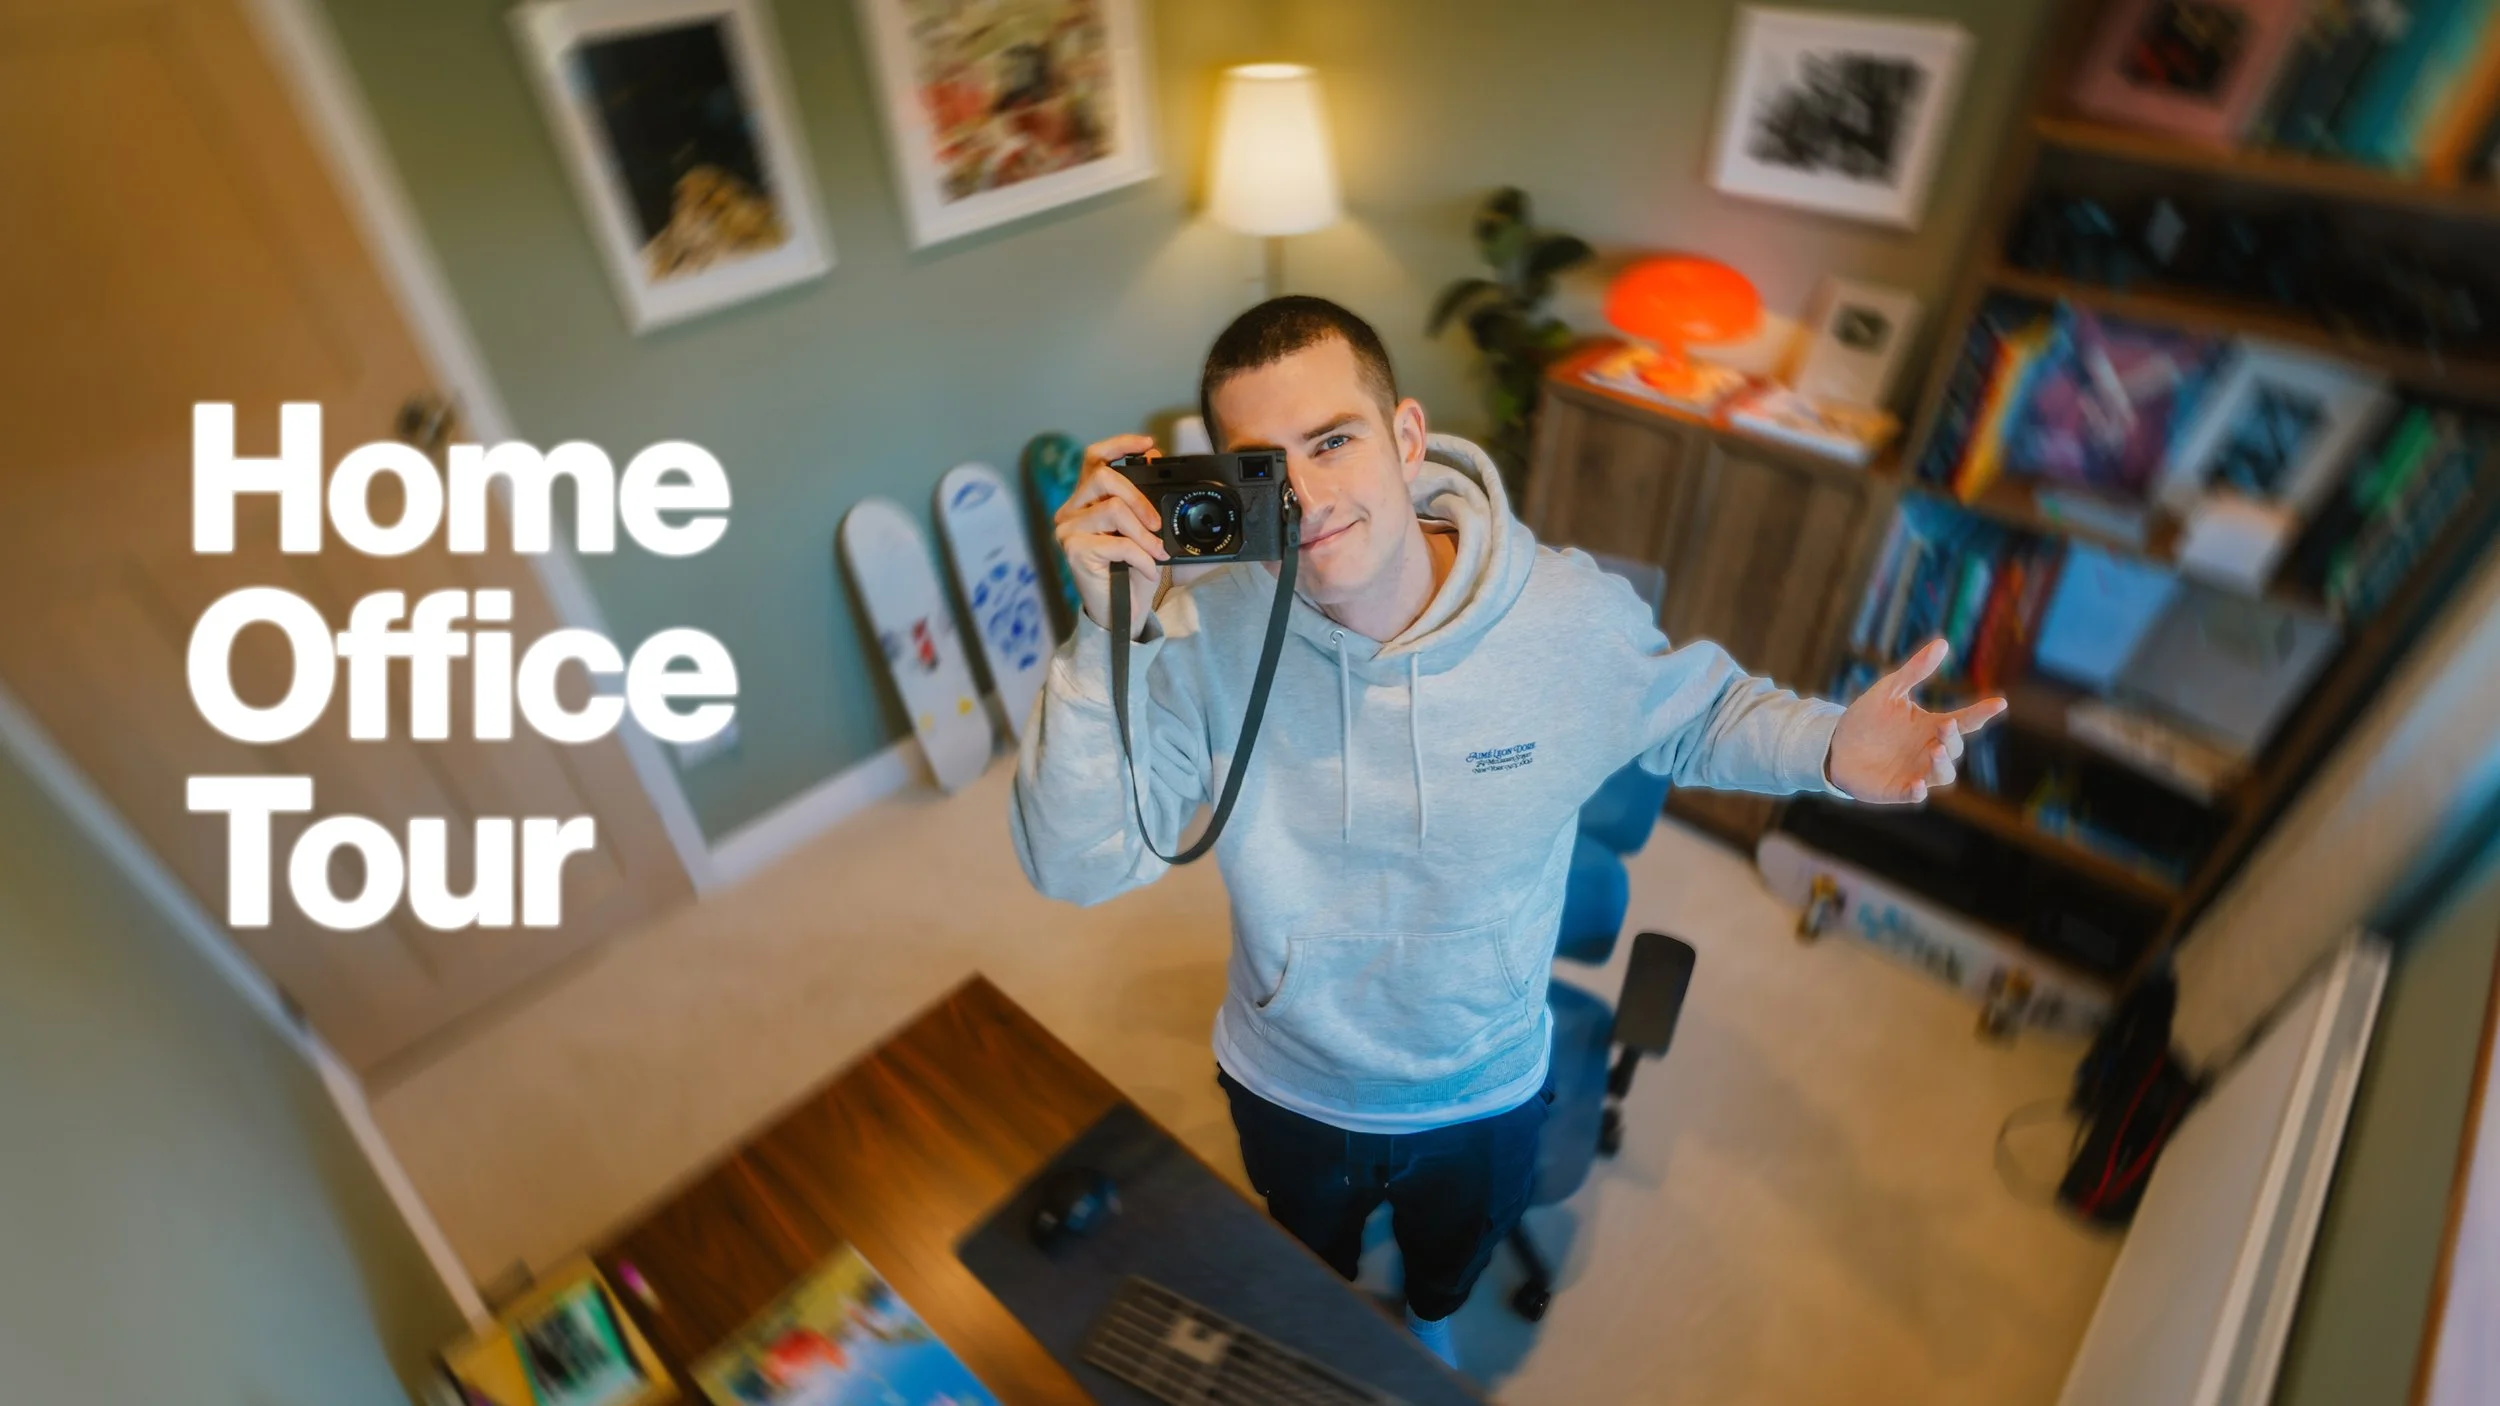
My Home Office Setup Tour: Photographer & Content Creator Workspace
After years of working from corners of living rooms and bedroom desks, I finally have my first dedicated workspace.
In this 3x3 meter room, I've built a space that functions as my YouTube filming studio, photo editing suite, and writing desk all in one.
I'll walk you through my desk setup, my video production gear, my workflow for managing 30TB+ of photo and video files, and how I've designed the space to be both functional for daily work and optimised for filming content.
Whether you're a photographer, content creator, or just looking for small home office ideas, this tour covers the practical workflow considerations and design choices that make a creative workspace actually work.
The Transformation
In August this year, we bought our first house. Which meant one of the bedrooms would become my office.
The room was in decent shape when we bought it, but we wanted to start fresh. I did quickly set my stuff up so I had somewhere to work, but almost immediately we started stripping it down to its bones.
For context, the room is almost exactly 3 meters by 3 meters. So not huge. But certainly enough for me to have everything I need.
First steps: we removed both radiators and replaced them with a new one. Took out the old skirting boards. Plastered the room. And then came the fun part - choosing the paint.


The Green
This is Lichen Green from Farrow & Ball. Well... sort of.
Farrow & Ball are expensive, so we went to B&Q and they colour-matched it into something that's 99% the same but way cheaper.
Why green, you might be asking? Because it's the best colour, obviously.
We did try a few samples early on. I wanted a forest green - like the camera straps we made earlier this year. That green is so cool. But I very quickly realised that dark green comes out dark dark green. Especially on camera, it almost appears black.
A note to anyone painting rooms... from my almost zero experience doing anything like this: dark colours show up even darker than you might expect.
In the end, this green is perfect. It's warm, cosy, but it's not like I'm working in a dark abyss. It's light enough to still feel open.

The Desk Setup
I needed a setup that would accommodate me sitting and editing most days, be comfortable, but importantly - be able to film videos easily and conveniently.
So everything I have set up for talking head shots is compact but quick to set up, without compromising on quality too much. Everything I need is within arm's reach.
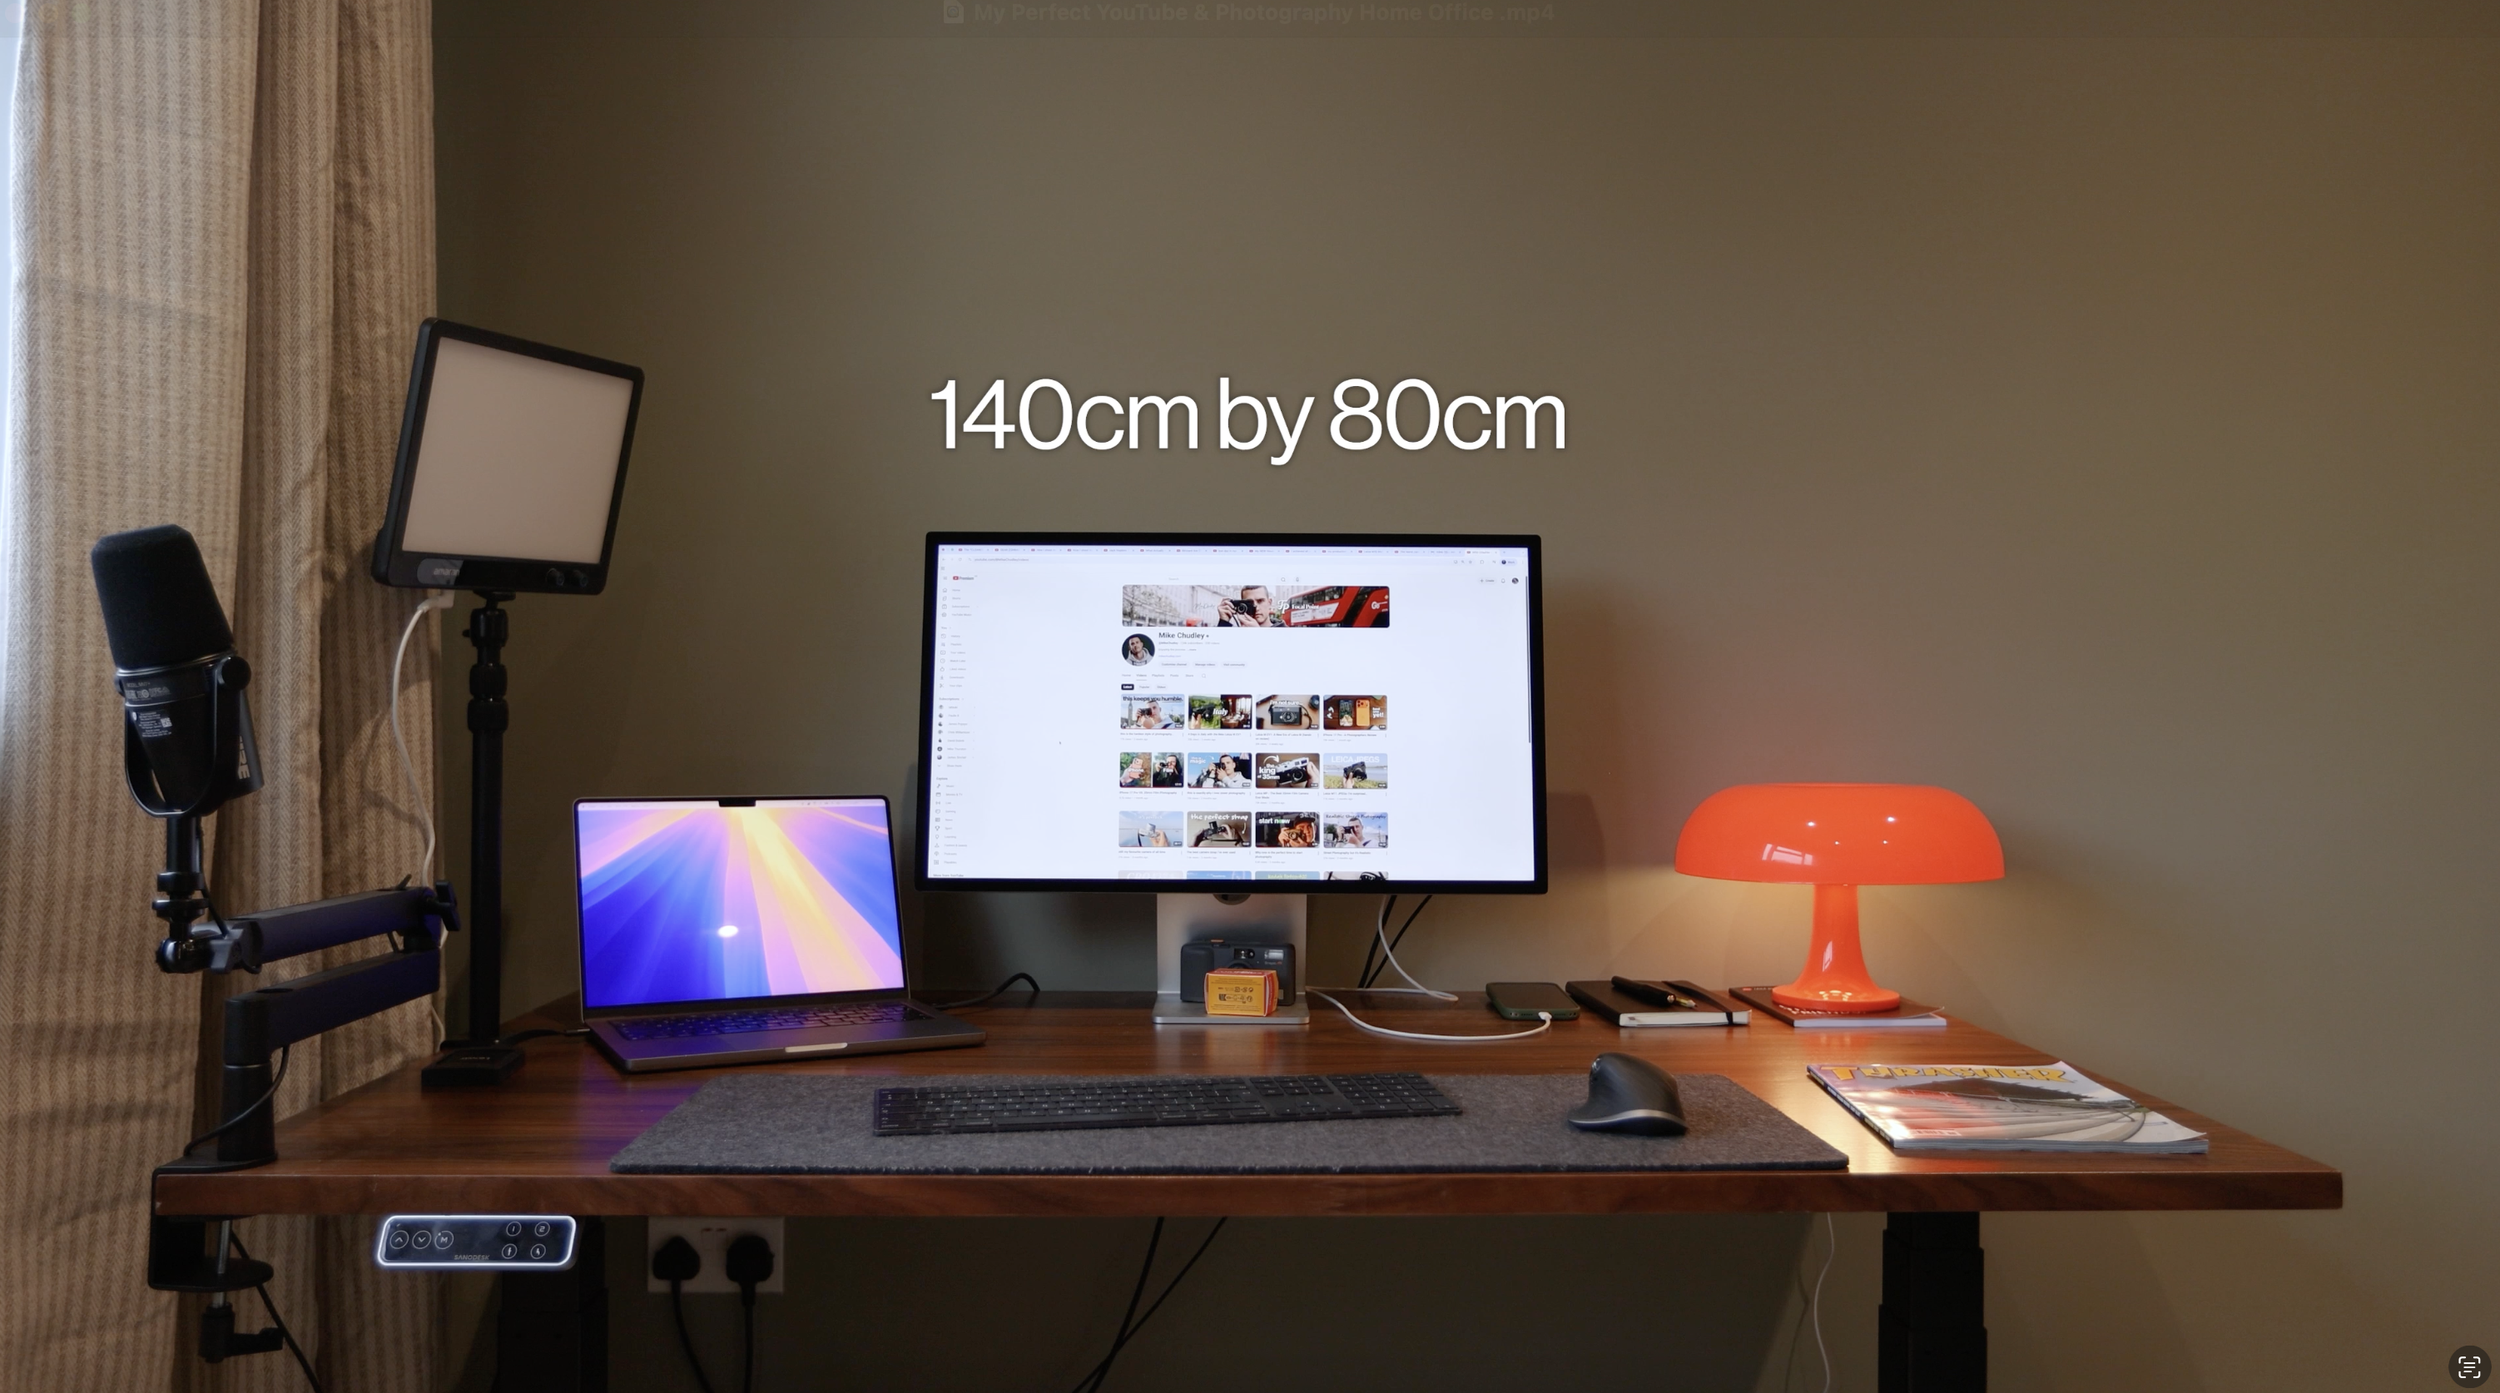
The Desk
This is a sit-stand desk from Flexispot - specifically from their E7 range. I've been using this for about 5 years now, and quite simply, it's perfect.
I've changed the desktop maybe once or twice over the years. I currently have this brown walnut desktop which is 140cm by 80cm. It's ideal for my laptop, 27" screen, and a bunch of clutter that might make its way around as I work.
The desk itself is adjustable in size, so if I wanted a wider or smaller desktop, you can make it fit no problem at all. It can hold up to 440lbs, ranges in height from 25.0" to 50.6", and comes with a 15-year warranty and 30-day risk-free return service.
The Chair
Moving onto the chair - which is maybe the most important part of any home office setup.
This is the C7 Ergonomic Chair from Flexispot.
This chair is probably the most versatile chair I've used - 5 levels of backrest height adjustment, adjustable seat depth, 3D headrest adjustment, and seat height adjustment. The chair offers a highly personalised experience.
The highlight is the lumbar support - keeping posture solid and not leaving a 6-hour editing session with any aches. This support can be adjusted in depth, height, and position to work with you, not against you. I even have this little extra cushion for added comfort.

Positioning
It was important for me to position the desk in this corner because my background for videos would be shooting into the opposite corner - giving me the cleanest composition.
This space behind me can be designed and built with it being a backdrop in mind. Any other configuration would mean the door or window would be creeping into the shot.
The Filming Setup
Let's talk about the gear mounted to the desk and how I film videos.
I have my video camera set up on a monopod - the IFOOTAGE Cobra 3. From reviews I watched, it's one of the best. Monopod over tripod because a tripod would need more space for the legs. This monopod can literally be tucked as far into the corner as possible. Very convenient.

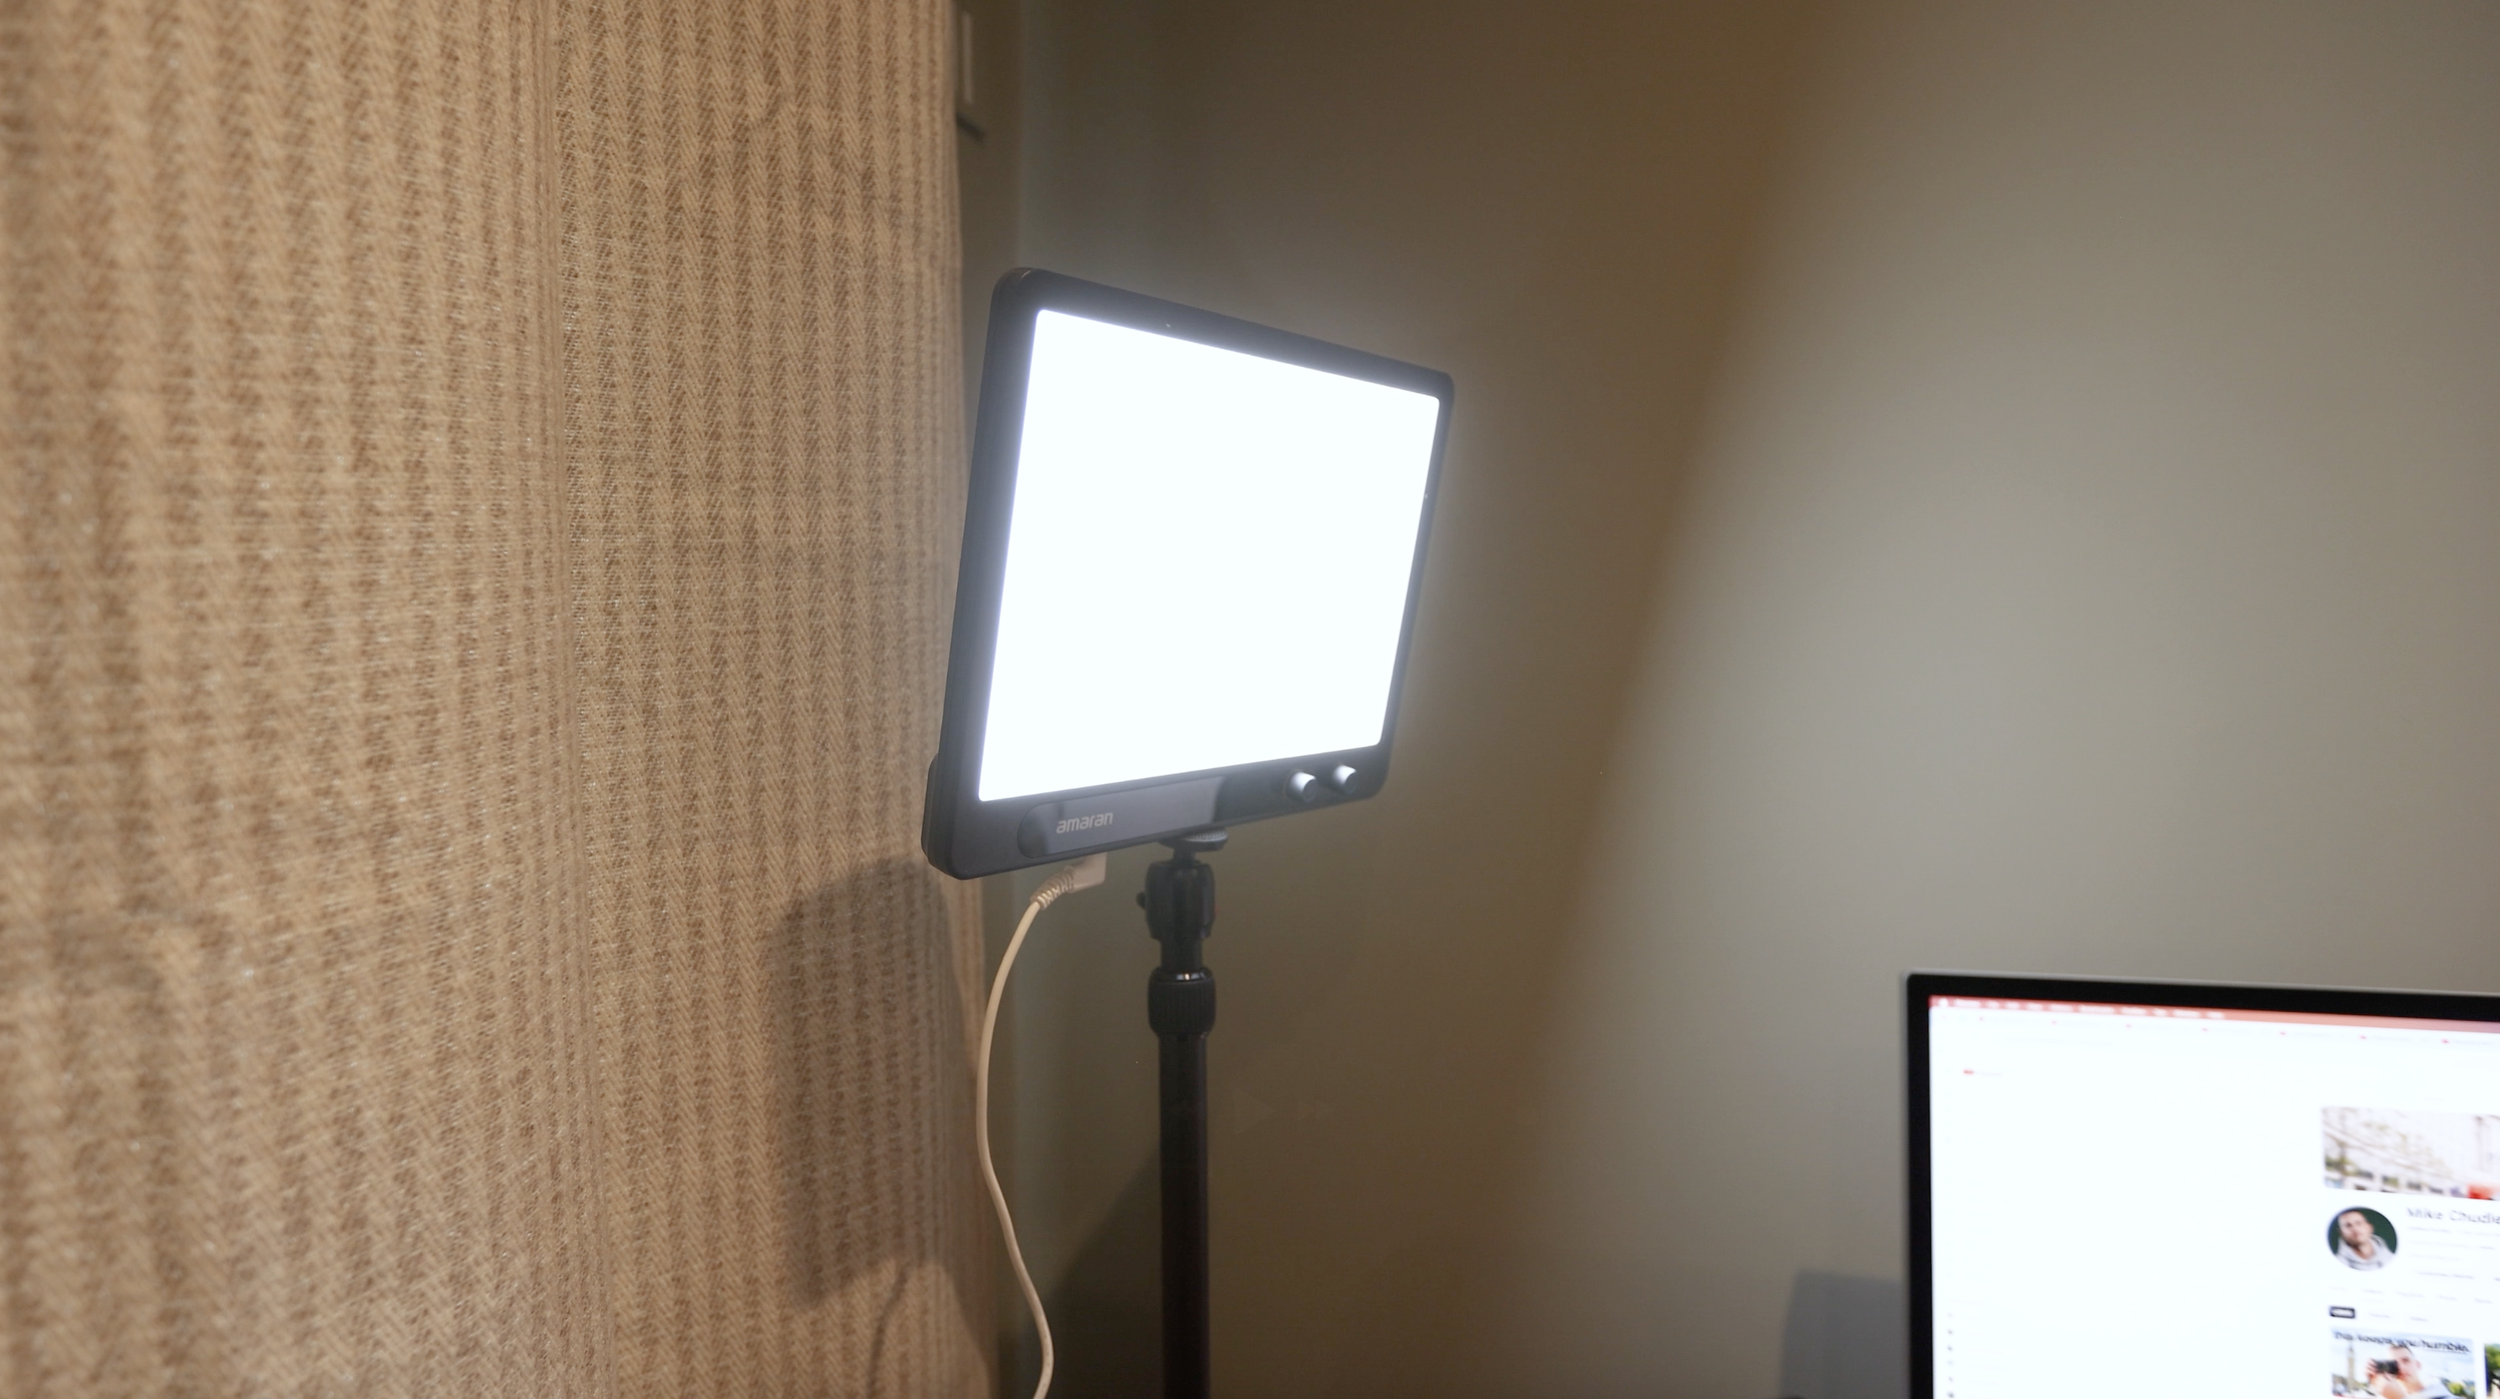
Just next to my video setup is an Amaran Verge LED panel for my key light, mounted with a desk mount from SmallRig. I can control this light straight from my phone, and it has some serious power. I'm filming at around 15% brightness most of the time.
Usually, the smaller the light source the harsher it is. Having a big softbox setup means your light is softer. An option I'm exploring is spinning the light around and bouncing the LED off a white sheet... but that needs figuring out. We're talking 2-3% improvements here. The panel as it is works fine for now.
The microphone is a Shure MV7, mounted on an arm and connected via USB straight to my MacBook. I've used the Shure SM7B mics before - you know, the ones everyone uses for podcasts. Probably one of the best mics on the market. But it's via XLR and not USB-C, so that would have been more faff. This MV7 basically sounds just as nice and is USB-C. Much more convenient.
For overhead shots - unboxing stuff, camera-in-hand B-roll - I have another SmallRig desk mount specifically for top-down shots. It was pretty cheap, but it doesn't go too high, so keep that in mind. It's perfectly okay for what I need, as long as I use a nice wide lens.


Tech & Workflow
I've been using the M1 Pro MacBook since it came out. Each year when I see the new snazzy M3, M4, and even M5, I'm tempted... but I can't justify it because this has been able to handle everything I throw at it. 4K video, editing thousands of photographs at once, even playing the odd game here and there.
Apple have completely outdone themselves with their MacBook lineup, in my opinion.
The Monitor
My monitor is the Apple Studio Display. It's a piece of art. It's quick, shows beautiful colours and contrast, and it means I'm somewhat consistent between editing photos and videos on this monitor and viewing them on my iPhone. It all works together in one seamless ecosystem.
I've tried a few monitors over the years, and after a while they've started to flicker or not connect with my MacBook easily. This Studio Display just seems to be the best option for what I need.


Storage: The NAS
Down in the hallway, I have my Synology DS1522+ NAS setup - a 5-bay RAID with just over 30TB of storage. This is down here because it's connected directly to my router, though I need to tidy this a little and protect it from the elements.
I've made a full video showing off my entire photography workflow, explaining this NAS setup and my full backup solution. Check it out here.
Having all my data on this NAS has been a game changer since I first got it about a year ago. In fact, from all the things I have in my office and all the things I need day-to-day - except for my camera and laptop - the NAS storage solution is my favourite thing I've implemented. If you're a creative of any kind, handling files, drives, cards all the time - I highly recommend getting one.

Keyboard & Mouse
The keyboard and mouse I've been using have been the same for almost 5 years - the Apple Magic Keyboard and the MX Master 3S from Logitech.
Easily the best mouse I've ever used. I plan on never switching this out.
However, I am sort of tempted to try a mechanical keyboard - something smaller than what I use at the moment, but with a little more feedback. Let me know if you have any recommendations.
Desk Accessories
The desk pad is from Balolo. This is all personal preference, but I've tried a few different types of desk pads, and this one is my favourite.
The lamp was a very recent addition. It was less than £20. It's plastic. It's kind of silly. But I do like the vibe it adds to the room. So if I'm feeling emo and working with the curtains drawn and lights off, this lamp adds a little something to the atmosphere.

The Rest of the Room
Now let's talk about the bookshelves, reading corner, and prints.
The Bookshelf
The main bookshelf and cupboard setup is a Billy bookcase from IKEA. They have a modular-type design system where you can order variations and decide if you want to add doors, glass windows, or how many shelves you want.
The whole thing took me a couple of hours to put together, and I'm not exactly experienced in this, so you could probably do it quicker. Basically, it was super straightforward.
I wanted the shelves to display all my photo books and provide quick access for any camera gear I need. Now I actually have room to expand the photo book collection, so you can expect a few more book-related posts and videos.
The small cupboard next to it holds all the essentials - chargers, cables, drives, nick-nacks, and all the little bits of nonsense you collect over the years.


The Reading Corner
In the corner I have a chair from Wayfair I had this in my old place and was thinking I'd get a new chair for this room, but once we put it here I thought - nevermind, this is chill.
Next to it are a couple of skate decks. The Primitive deck is very cool as it's signed by one of the GOATs, Paul Rodriguez.
To the right of the chair is a plant (no idea what it's called), just to add a little bit of life to the room.
Behind the chair is an IKEA lamp lighting up my background. Simple, but I thought it didn't look too generic. Has that vintage style but remains subtle.
However, I've only set up this talking head shot a few times so far, and I think that lamp might be too bright directly behind me. I might move it over near the door when filming, so we have a little bit of backlight but not too much. Still figuring this out.


The Prints
The frames are from IKEA, and I went with 3 different sizes - just so everything wasn't too uniform. I think a mix of portrait and landscape photos works nicely.
The Inspiration Wall
The wall that I actually face when working is empty right now.
Do I just completely fill it with more photos? I'm thinking it becomes my inspiration wall. Photos from friends of mine, prints from photographers I admire, film, TV, music inspiration...
I'm tempted to just completely fill it with anything. Or do I keep it simple and fitting with the rest of the room? Maybe the skate decks can hang here... I'm not sure yet.

Final Thoughts
So yeah, that's the space.
My first dedicated home office. My filming room. My editing suite. My little corner of the world.
It's small. It feels cosy. But it's everything I need.
And honestly, I'm just really happy to finally have a space that's completely mine.
Thanks for reading. I'd love to hear what your setup looks like, or if you have any ideas about mine - drop me a message or leave a comment on the YouTube video.
See you on the street.
Mike
